How to Increase Maximum Upload File Size in WordPress

If you’re a WordPress user, you might have encountered the frustrating message: “exceeds the maximum upload size for this site.” This message appears when you try to upload a file that exceeds the maximum upload file size limit set by your WordPress installation. While this limit is in place to prevent server overload, there are valid reasons for wanting to increase it. Whether you need to upload large media files or install themes and plugins that exceed the default limit, this article will guide you through various methods to increase the maximum upload file size in WordPress.
Understanding the Default Upload File Size Limit
Before we delve into the solutions, it’s essential to understand why WordPress imposes a maximum upload file size limit. This limit serves several purposes:
- Server Resource Management: Uploading large files can consume significant server resources, potentially affecting the performance of your website.
- Security: Large file uploads can be exploited for malicious purposes, so limiting the file size helps protect your site from security threats.
- Shared Hosting: Many WordPress users are on shared hosting plans, where server resources are shared among multiple websites. A file size limit prevents one site from monopolizing resources.
Now, let’s explore how to increase this limit to suit your specific needs.
Methods to increase max upload file size in WordPress
Method 1: Editing the php.ini File
- Access Your Server: To begin, you need access to your website’s server. This method might not work on all hosting providers, as some may restrict access to the php.ini file.
- Locate the php.ini File: Look for the php.ini file in your server’s root directory or the “public_html” folder of your website. If you can’t find it, contact your hosting provider for assistance.
- Edit the php.ini File: Open the php.ini file using a text editor or an FTP client. Find the line that says “upload_max_filesize” and “post_max_size” and increase their values to the desired file size limit. For example, to set the limit to 32MB, you would change them to:
upload_max_filesize = 32M
post_max_size = 32M
- Save and Restart: Save your changes and restart your server.
Method 2: Editing the .htaccess File
- Access Your Server: Similar to the php.ini method, you’ll need access to your server.
- Locate the .htaccess File: Look for the .htaccess file in your website’s root directory.
- Edit the .htaccess File: Open the .htaccess file and add the following lines at the end:
php_value upload_max_filesize 32M
php_value post_max_size 32M
- Adjust the file size limit as needed. Here 32M written you can increase by 500M or something
- Save the .htaccess File: Save your changes to the .htaccess file.
Method 3: Editing the wp-config File
- Access your wp-config file in your WordPress root directory.
- Paste given below code.
@ini_set('upload_max_size' , '256M' );
- Save the wp-config.php file and refresh.
Method 4: Via Max Upload file size WordPress Plugin
Max Upload File Size WordPress Plugin that allows you to increase your max upload filesize in wordpress.

- Go to your dashboard, Click on Plugins, and Then click on Add new
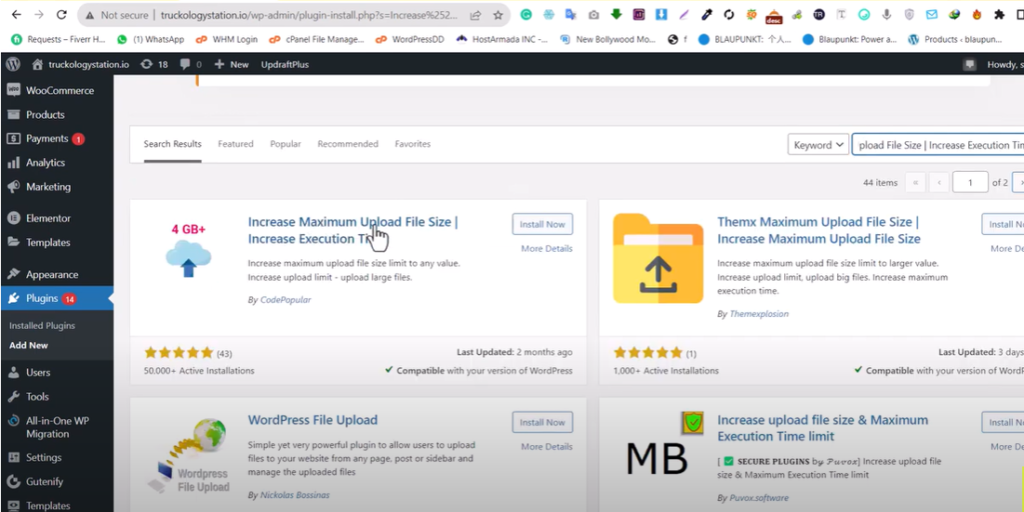
- In the Plugin search Box, search for “Increase Maximum Upload File Size | Increase Execution Time”
- In the search box, you will see this plugin as shown in the above Screenshot.
- Just click on Install and Activate.

- After installing and activating this plugin you will see the Increase Upload Limit option in the media option. As you can see in the above screenshot. Just click on that option.

- Now, in next screen will be just like the above screenshot. Choose the Maximum Upload File Size according to your need. For example, I select 4GB.
- In maximum execution time put your amount for example 3600.
- Now click on Save Changes.
I hope all of these methods will work for you. I’ve explained all methods that can work for you. If any other method do you have, you can comment below with your own method and solution.


