
How to add Before and After Lines in Elementor Text CSS Code
Before and after lines in Elementor are very easy using custom css. The Elementor page builder does not provide a pre-build Before and after lines widget.
There are 3 Types of Text with Before-border and After-border text in Elementor.
Before and after Border Text in Elementor
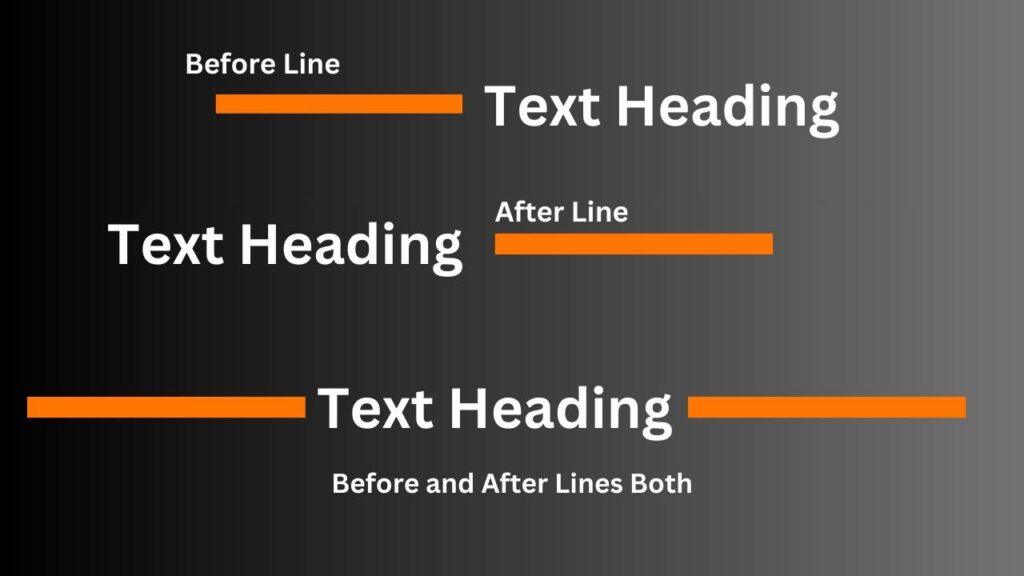
In given above image, before text, after text, and before and after text examples are given.
Steps to add before and after text in Elementor.
First of all, you need to add any text or heading widget into Elementor.
After adding the widget, you need to navigate to Custom CSS and add the given codes below.
CSS code for before text line
h6 {
        font-family: Poppins;
        margin: 100px auto;
        color: #696969;
        text-align: center;
        font-size: 30px;
        max-width: 76%;
        position: relative;
      }
      h6:before {
        content: "";
        display: block;
        width: 130px;
        height: 2px;
        background: #D8D8D8;
        left: 0;
        top: 50%;
        position: absolute;
      }
Note: This code will work for H6, so you need to change h6 by p or any Heading tag to use in Elementor.
CSS code for After text line
h5 {
        font-family: Poppins;
        margin: 100px auto;
        color: #696969;
        text-align: center;
        font-size: 30px;
        max-width: 73%;
        position: relative;
      }

      h5:after {
        content: "";
        display: block;
        width: 130px;
        height: 2px;
        background: #D8D8D8;
        right: 0;
        top: 50%;
        position: absolute;
      }
}
Note: This code will work for H5, so you need to change h6 by p or any Heading tag to use in Elementor.
CSS code for before and After text line
h5 {
        font-family: Poppins;
        margin: 100px auto;
        color: #696969;
        text-align: center;
        font-size: 30px;
        max-width: 73%;
        position: relative;
      }
      h5:before {
        content: "";
        display: block;
        width: 130px;
        height: 2px;
        background: #D8D8D8;
        left: 0;
        top: 50%;
        position: absolute;
      }
      h5:after {
        content: "";
        display: block;
        width: 130px;
        height: 2px;
        background: #D8D8D8;
        right: 0;
        top: 50%;
        position: absolute;
      }
}
The complete tutorial is also provided in this article. You can watch this tutorial to add codes properly.
Read more Related articles
How to convert canva template into WordPress Elementor
Another way to add
Elementor is a popular page builder plugin for WordPress that allows you to create and design web pages with ease. Adding before and after lines (often referred to as “separator lines” or “divider lines”) to a text element in Elementor can help improve the visual appeal and structure of your content. Here’s how you can add before and after lines to a text element in Elementor:
- Edit your Page or Post:
Log in to your WordPress dashboard, go to the page or post where you want to add the before and after lines, and click on the “Edit with Elementor” button. - Add or Edit the Text Element:
Select the text element you want to add the lines to, or add a new text element by dragging and dropping it onto your page. - Customize the Text Content:
Edit the text content inside the text element as per your requirements. - Add Before and After Lines:
To add the before and after lines, you can use HTML and CSS within the text element. Here’s an example of how you can do this: a. Before Line:
To add a line before the text, you can insert the following HTML code at the beginning of your text content: - This code creates a
divelement with a class name “line” that you can style with CSS. b. After Line:
To add a line after the text, you can insert the following HTML code at the end of your text content:<div class="line"></div> - Style the Lines with CSS:
To style the lines, you can add custom CSS. You can do this by going to the “Advanced” tab in the text element’s settings. Here’s an example of CSS to style the lines:
   .line {
       border-top: 2px solid #000; /* Change the color and thickness as needed */
       margin: 10px 0; /* Adjust the spacing above and below the line */
   }
You can modify the border-top, margin, and other CSS properties to customize the appearance of the lines.
- Update and Preview:
After you’ve added the HTML and CSS for the before and after lines, click the “Update” button to save your changes. You can then preview your page to see how the lines look.
Remember that making direct HTML and CSS modifications might require some knowledge of these languages, and it’s important to test and adjust the styles to achieve the desired look. Also, make sure to back up your site before making any significant changes, and consider using a child theme if you plan on making extensive customizations to your site’s design.