
Brew Better Coffee: My Favorite V60 Tips and Tricks
Welcome to the World of V60 Pour-Over Coffee
If you’re ready to take your coffee game to the next level, you’ve landed in the right place! In this article, I will share my personal favorite tips and tricks for brewing the perfect cup of coffee using the V60 pour-over method. This manual brewing style not only gives you control over the process but also enhances the flavor of your coffee.
Whether you’re a curious beginner or an experienced barista, there’s something here for everyone. The V60 method is all about precision, and I’ll guide you through the essentials to make every cup a delightful experience. From understanding the brewing method to mastering nuanced techniques, my aim is to help you appreciate each sip even more.
Let’s dive in and explore how you can begin brewing better coffee today! ☕✨


Understanding the V60 Brewing Method
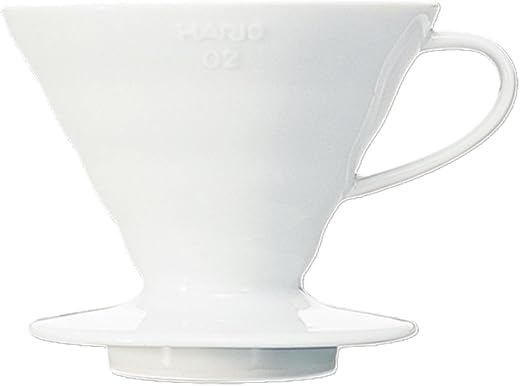
The V60 pour-over method is more than just a brewing technique; it’s a dance of precision and flavor that transforms coffee-making into an art form. At the heart of this method is its unique design—the cone shape and spiral ridges—that play a crucial role in ensuring optimal extraction of flavors from the coffee grounds.
The Cone Shape
The V60’s cone shape is intentional, allowing water to flow through the coffee grounds at an angle that encourages even extraction. This design creates a funnel effect, letting the liquid pour down smoothly into your cup rather than pooling at the bottom. The angle of the cone, typically around 60 degrees, minimizes the risk of over-extraction, which can lead to bitterness. In contrast, it’s also engineered to accommodate different brewing styles—whether you prefer a fast or slow pour.
Spiral Ridges
Next up are the spiral ridges that line the interior of the V60. These ridges create air pockets that promote consistent water flow and ensure that the coffee grounds never become too compacted. This promotes a more even saturation of the grounds, which is vital for achieving a well-balanced cup. As the water flows down, it passes over the grounds in a way that extracts all the delicious subtle notes unique to each coffee variety.
The Pour-Over Process
Using the V60 is an engaging experience that allows full control over brewing variables such as water temperature, pouring speed, and brew time. I always encourage fellow coffee enthusiasts to view this process as a ritual that requires your undivided attention—time spent brewing is as valuable as the coffee itself.
As you pour, your technique becomes paramount. Whether it’s going for a steady stream or a gentle spiral, each pour creates a different extraction profile and ultimately influences flavor. From my personal experience, I find that adjusting the pour technique can dramatically change the complexity of your cup.
In sum, the V60 brewing method combines thoughtful design with enjoyable ritual, making it both accessible and fascinating. This foundation sets the stage for exploring the best coffee beans to use in your V60, enhancing that delightful experience even further. Let’s move on to the next section and discuss how to choose the right coffee beans that match your brewing style!
Choosing the Right Coffee Beans
Selecting the right coffee beans is one of the most crucial steps in perfecting your V60 pour-over experience. The beans you choose can significantly influence the flavor profile of your brew. Here, I’ll share my insights on how to elevate your coffee game by picking beans that complement the V60 method.
Freshness is Key
Freshness should be your number one priority when choosing coffee beans. Coffee tastes best when brewed within a few weeks of roasting. I recommend sourcing beans from local roasteries or reputable online retailers that prioritize fresh roasts. When selecting your beans, always check the roast date—ideally, you want your coffee to be consumed within 2 to 4 weeks of roasting for optimal flavor.
Roast Levels
Next, consider the roast level that suits your palate. Different roast levels bring out varying flavor notes:
Experimenting with different roast levels can be a fun journey! I personally enjoy trying a variety of origins to see how the roast level changes the profile.
Ideal Grind Sizes
The grind size is instrumental in the V60 method. For instance, a medium-fine grind is often recommended for optimal extraction with the V60 as it balances water flow and contact time. A grind that’s too coarse can lead to under-extraction, while a grind that’s too fine can cause over-extraction, yielding a bitter cup. If you’re uncertain where to start, think of the consistency resembling granulated sugar—this texture allows the water to flow through your coffee grounds evenly, promoting more balanced flavors.
Coffee Origins to Explore
Here are a few personal recommendations for coffee origins that shine with the V60 method:
Speaking of delightful flavors, one of my go-to options is the Mt. Comfort Organic Peru Medium Roast Coffee. It showcases a beautifully balanced profile with hints of chocolate and nut, making it an excellent choice for V60 brewing.
By thoughtfully selecting your coffee beans based on freshness, roast level, and grind size, you’ll be well on your way to brewing a fantastic cup with your V60. Next up, we’ll discuss mastering the pour technique—an essential skill that’ll bring out the best in those carefully chosen beans!
Mastering the Pour Technique
When it comes to the V60 pour-over method, the art of pouring is what truly sets the stage for an exceptional cup of coffee. It’s not just about getting the water over the coffee grounds; it’s about crafting a beautiful extraction that maximizes those delicious flavors you’ve chosen. Let’s dive into my favorite pouring techniques, starting with the basics.
The Importance of Water Temperature
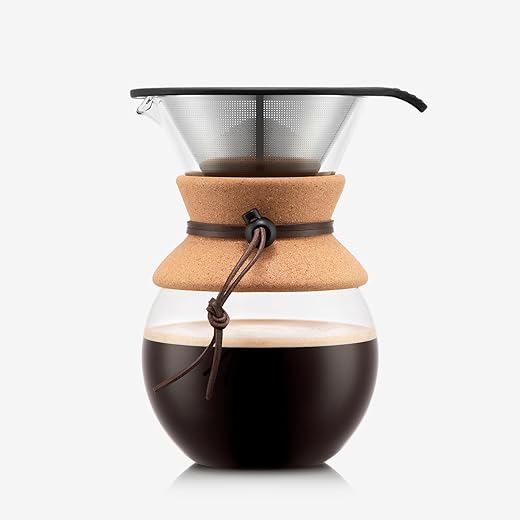
One of the first things I learned was that water temperature plays a crucial role in extraction. Using water that’s too hot can lead to bitterness, while water that’s too cool may result in under-extraction. Aim for a temperature around 195°F to 205°F (90°C to 96°C). To make this easier, I rely on a kettle with temperature control, like the Bodum 27oz Electric Gooseneck Water Kettle, which allows me to pour at just the right temp every time.
Pour Rate and Technique
Flow rate is equally essential. When pouring, I suggest starting with a slow, controlled drip. Pour gently in a spiral motion to ensure all grounds are evenly saturated. This helps avoid over-wetting or dry spots that can lead to uneven extraction. A consistent pour rate of about 2 ounces per 30 seconds is a good baseline to aim for, particularly for a standard 12-gram coffee dose. As I pour, I often notice the water forming beautiful patterns that bring excitement to the brewing ritual.
Overcoming Common Pouring Mistakes
Avoiding common pouring mistakes can elevate your V60 experience significantly. Here are a few to watch out for:
Building Your Pouring Cadence
I usually split my pours into two or three stages, which not only allows the coffee to bloom but also maintains an even extraction. Here’s a simple rhythm to follow:
- First Pour: 30 to 50 grams of water to saturate and bloom.
- Second Pour: Once the bloom is complete, pour in a spiral motion to 150 grams gently.
- Third Pour: Finish to your total weight, usually around 200-240 grams, depending on your brewing ratio.
Building this cadence helps me make brewing feel both rhythmic and intimate. Pouring becomes a meditative practice rather than just a means to an end.
With these tips, mastering the pour can transform your V60 coffee into a richly flavored and aromatic experience. Next, we’ll explore how to find the perfect brew ratio and time, seamlessly connecting our pouring technique with the essence of coffee extraction!
Finding the Perfect Brew Ratio and Time
To unlock the full potential of your V60 coffee, understanding the perfect brew ratio and timing is essential. By carefully considering these factors, you can customize your coffee experience based on your taste preferences.
Understanding Brew Ratios
The coffee-to-water ratio is a key player in the brewing game. A general starting point is the 1:16 ratio—1 gram of coffee for every 16 grams of water. For example, if you’re using 20 grams of coffee, you’d want to use about 320 grams of water. This ratio tends to produce a balanced cup that isn’t too strong or too weak.
Here’s a quick breakdown of common ratios:
Experimenting with these ratios can be quite rewarding! For instance, I often use the 1:15 ratio for rich, fruity Ethiopian beans, while leaning towards 1:17 for the smooth, chocolatey Colombian varieties I love.
Timing Is Everything
Equally important to the ratio is the timing of your brew. For the V60, a good brew time typically ranges between 2:30 and 3:30 minutes, depending on your coffee grind size and desired strength. Here’s a simple guideline to help achieve that perfect timing:
- Pre-wet the Filter (30 seconds): Before adding coffee, rinse the filter with hot water. This not only gets rid of papery flavors but also preheats your V60.
- Blooming Stage (30–45 seconds): After pouring the initial amount of water, allow the coffee to bloom. This allows CO2 to escape, promoting better extraction during the brewing process.
- Subsequent Pours (1:30 to 2:30 minutes): Gradually add water in a spiraling motion until reaching your target weight.
- Total Brew Time (2:30 to 3:30 minutes): Aim to finish the brewing process within this timeframe. If your coffee is brewing too quickly, consider a finer grind; if it’s too slow, go coarser.
Adjustments Based on Bean Type
Not all beans are created equal, and their unique characteristics can influence the ideal brew parameters. For instance, a brighter Ethiopian coffee may bloom differently compared to a richer Brazilian coffee.
If you’re working with a brighter coffee variety, you might want to start with a coarser grind to enhance brightness while aiming for a longer brew time to pull out sweetness and complexity. Conversely, for a dark roast, a finer grind with a shorter brewing time might prevent bitterness.
To keep everything consistent, I highly recommend using a reliable coffee scale, like the Rechargeable Mini Coffee Scale with Timer. It makes measuring coffee and water a breeze, ensuring your ratios are spot on each time you brew.

With the right ratios and timing, your V60 can become a gateway to discovering a world of flavors in coffee. Next, we’ll delve into advanced V60 techniques that will further elevate your brewing prowess and take your coffee game to the next level!
Exploring Advanced V60 Techniques
If you’ve mastered the basics of the V60 method and are eager to take your coffee brewing game to the next level, you’re in the right place. In this section, I’ll cover some advanced techniques that can help unlock deeper flavors and elevate your experience. Prepare to delve into the world of bloom timings, multi-stage pours, and precise temperature control.
Perfecting the Bloom
Blooming is an essential step that can significantly impact the flavor extraction of your coffee. This process involves hydrating the coffee grounds before the full brew, which allows gases to escape and prepares the coffee for optimal extraction.
From personal experimentation, I find that adjusting the bloom timing depending on the coffee type brings out their distinctive profiles. Lighter roasts often benefit from a longer bloom, while darker roasts may need less time.
Multi-Stage Pours
Switching up your pour technique can also enhance extraction. Instead of a single continuous pour, experiment with multi-stage pours:
- First Stage: A gentle, light pour to saturate the grounds and encourage blooming.
- Second Stage: After blooming, increase your pour rate to a steady, confident spiral to fully extract flavors.
- Final Stage: Finish with a controlled pour to focus on extracting the remaining sweetness and body.
My go-to method involves pouring around the edge of the coffee bed, avoiding the center where channeling is more likely to occur. This deliberate approach helps maintain even flow and maximizes flavor extraction—who knew pouring could be an art form?
Temperature Control
Temperature control can be a game changer in your brewing process. The right temperature can profoundly influence your cup’s flavor profile. Here’s how to ensure you’re pouring at the optimal temperature:
With these advanced techniques in your brewing repertoire, you’ll be able to chase distinct flavor profiles that reflect the rich diversity of coffee beans. Getting hands-on with these methods will not only refine your skills but make brewing coffee feel like a joyful exploration.
Now that you’ve discovered the advanced aspects of the V60 method, you’re well-equipped to continue your aromatic journey into the world of coffee. In the next section, let’s embrace the joy of enjoying your coffee journey!

Enjoy Your Coffee Journey
In conclusion, the V60 pour-over method opens up a world of flavor and technique for every coffee enthusiast. With the insights and tips provided, I hope you feel inspired to refine your brewing skills and discover new heights of deliciousness right in your kitchen. Each brew is an opportunity to experiment and indulge in the rich world of coffee.
Remember, coffee brewing is as much about personal enjoyment as it is about technique. So, I encourage you to embrace your coffee journey with curiosity and creativity. Don’t hesitate to try new beans, adjust your techniques, and, most importantly, relish every delightful sip. Happy brewing!


Just ordered that DK177 coffee bar mat—can’t wait! No more splashes everywhere! 😂 How long does it take to get used to using it?
You’ll love it! I still spill sometimes, but it’s a major improvement.
It’s super handy! Less mess means more coffee fun!
It really helps keep things tidy! You’ll get the hang of it in no time.
This article is spot on! I love exploring advanced techniques with the V60. Anyone else figured out how to enhance flavors with the pour? The thermometer tip is clutch!
I experimented once with bloom times—letting the coffee sit for 30 seconds before pouring really changed the game!
Tempering the water temperature definitely helps balance the flavors.
That’s a great tip Max! Water temp was a game changer for me too!
Love the V60! The ceramic dripper looks pretty stylish too! Anyone have thoughts on how it compares to the plastic ones?
The ceramic definitely retains heat better, which can improve the brew. It’s a matter of preference!
I switched from plastic to ceramic and noticed a huge difference in flavor clarity.
Yeah, I have both, and while the plastic is lighter, the ceramic does make the coffee taste better, IMO!
The advanced techniques section blew my mind! The amount that goes into a good cuppa is insane! 😂 Who knew pouring could be so much fun?
Right? It turns into a science experiment! Who would’ve guessed? ☕🔬
Glad you’re enjoying the details, Nate! It’s amazing what you can discover.
I didn’t wanna become a ‘coffee snob’ but here I am, experimenting with the V60. 😂 Help! Any tips on transitioning from regular brews to this?
You can absolutely avoid being a snob! Just enjoy the journey. It’s about what tastes good to you!
No shame! At least you’re exploring! Just take your time with each step.
Just keep it simple at first! Better espresso is the goal, after all!
This is really informative. I didn’t really think about coffee ratios before. Just grabbed scoops and brewed! 😂 Definitely trying this method! What would you suggest for a quick start?
Yeah, definitely. Experiment a little! The scale will help.
Start with a 1:15 ratio as a basic guideline! You can always tweak once you find what you like.
Go for a medium roast initially! It’ll be a good middle ground for experimenting.
I just tried the V60 method for the first time today and wow, what a difference in flavor! I’m using the Mt. Comfort Organic Peru coffee—I can totally taste the beans in it! ☕️ Anyone else tried this? What beans do you recommend?
Ethiopian beans are nice, but I really enjoy a smooth Colombian brew. Totally personal preference, for sure!
I love that coffee! If you’re looking for something different, you should try some Ethiopian beans. They have a nice fruity profile. 🍒
Glad to hear you’re enjoying it, Emily! The pouring technique really brings out the flavors.
Tested some weird coffee beans today… The brewing method did help bring out something interesting, but I don’t know if I loved it or hated it! 😅 Have you all ever had those experiences?
I had that with a weird flavored bean—I was like, ‘What am I drinking?’ Could be fun!
LOL, sometimes you win and sometimes you learn, right? Share what beans you tried!
Can someone explain what you mean by ‘bloom’ in coffee brewing? I’ve seen it mentioned a lot but I don’t get it lol.
Yeah, basically you wet the grounds and let them swell up first, helps with extraction.
Haha, it’s just letting the coffee grounds expand before you pour the full amount of water. Enhances flavor!
Don’t worry, Katie! It’s not complicated, just a step in making it taste better!
These tips are awesome! The part about using the right brewing ratio made such a difference. My coffee tastes way less bitter now! I might invest in that rechargeable mini coffee scale for more precision. ☕❤️
Exactly! Ratio is key. I always start with a 1:15 ratio—anyone have other ratios they use?
I got the mini scale, and it’s been a game changer for my morning routine. Definitely worth it!
So glad you found that part helpful! The scale really does make a difference.
Hearing so much hype about the Bodum kettle. Anyone has it? Is it really worth the $?!
It’s definitely a solid investment! The control you get is great for brewing.
The gooseneck spout is awesome for precision. If you’re serious about coffee, it’s worth it!
I have one and love it! Much better than my old kettle.
Any recommendations on which electric kettle heats up the fastest? I always run late in the mornings! 🤯 Quick suggestions?
The Bodum kettle heats up super quick! Perfect for those rushed mornings.
I use a Fellow kettle, and it’s quick. Worth checking out!
I actually got the V60 when I was trying to cut down on sugar in my coffee—crazy how it taught me to appreciate flavors! 😀 Anyone else find that?
For sure! Once you taste a well-brewed cup, you’ll realize it doesn’t need any sugar!
Love that! It makes such a difference when you steer away from sweeteners.
Anyone else think this is a bit complicated? All the ratios and timing seem overwhelming to me… Maybe I’m just too lazy for this! 😂
Totally understandable! It can seem like a lot at first.
I felt the same until I tried it! It gets easier once you find your groove.
Start with the basics! You can simplify your method until you feel comfortable.
This article was super helpful, but I still can’t get my pour right. I keep making it too fast, and it tastes watery. Anyone figured out how to slow down their pour effectively? 🤔
I had the same issue, James. It really helped when I focused on my wrist movement rather than just pouring like crazy!
Practice makes perfect! Try to pour in a circular motion and keep it steady.
Make sure you’re using a gooseneck kettle! It helps you control the pour much better.