
Brew Like a Pro: My Top 7 Manual Coffee Makers Revealed
Welcome to the World of Manual Brewing!
In the world of coffee lovers, the journey from bean to cup can be just as exciting as the end result. There’s something special about taking control of the brewing process, allowing the rich flavors and aromas to unfold at your fingertips. I’m thrilled to share my experiences with manual coffee makers, which have transformed my mornings and elevated my overall coffee game.
In this article, I’ll explore my top seven favorite manual coffee makers, each chosen for their unique features and capabilities. Whether you’re a seasoned barista or a curious novice, these brewers will help you create a delicious cup every time. Let’s dive in and discover how you can brew like a pro!


Why Choose Manual Brewing?
Before diving into my top picks, let’s discuss why manual brewing is worth your time and effort. Personally, the hands-on approach of manual brewing turned my coffee ritual into an art form rather than just a routine.
Greater Control Over Brewing
One of the most significant advantages of manual brewing is the level of control you get over every aspect of the process—grind size, water temperature, and brewing time. For example, when I first experimented with a French Press, I realized that tweaking the grind size dramatically impacted the flavor. A coarse grind resulted in a smooth, mellow cup, while a finer grind brought out more bitterness. By having that control, you can tailor your brew to suit your personal taste preferences.
Enhanced Flavor and Aroma
With manual brewing, you can unlock the rich and complex flavors that pre-packaged machines often overlook. The connection between you and your coffee allows for a more engaging experience. I recall a weekend morning where I brewed a pour-over coffee and savored the vibrant floral notes that came alive with each sip. It wasn’t just coffee; it was an experience steeped in anticipation.
Mindfulness in Preparation
I also love how manual brewing encourages mindfulness. The simple act of measuring, grinding, and pouring becomes a meditative ritual. Each step is an opportunity to connect with the ingredients and appreciate their journey from farm to cup.
As we prepare to explore the specific coffee makers that can help you brew like a pro, remember that every cup tells a story, and with manual brewing, you’re the storyteller. Let’s turn our attention to the first classic option on my list: the French Press.
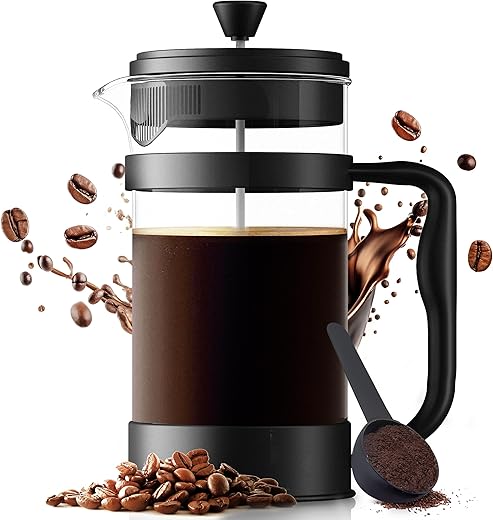
The Classic French Press
The French Press is a classic for a reason! When I think of rich, full-bodied coffee, it’s the first brewing method that comes to mind. Using a French Press is a straightforward process, but the depth of flavor it produces is remarkable. Here’s how to brew an exceptional cup.
Steps to Brew
- Choose Your Coffee: Start with coarsely ground coffee—about 1 tablespoon for every 4 ounces of water.
- Heat the Water: Boil your water and allow it to cool slightly; aiming for around 200°F (just off boil).
- Combine: In the French Press, add the coffee grounds, then pour the hot water over them.
- Wait: Put the lid on and let the brew steep for about 4 minutes. This is where the magic happens as the grounds release their flavors.
- Press and Pour: Slowly press down on the plunger, separating the grounds from the brew. Pour yourself a cup and enjoy!
Rich Flavors Await
What I love most about the French Press is its ability to preserve essential oils that contribute to its full-bodied flavor. Unlike paper filters, this method allows more of those oils to seep into your cup, resulting in a rich and satisfying brew.
I’ve had the pleasure of using the Utopia Kitchen French Press Coffee Maker during my morning routine. It’s durable and easy to clean, which is a bonus when I’m rushing out the door.
While exploring the French Press, I’ve discovered various coffee types enhance the brewing process—darker roasts bring out a chocolatey richness, while lighter blends reveal delightful citrus notes. It’s a delightful way to experiment with your preferences and discover new taste profiles.
As we continue our journey through manual brewing, let’s shift our focus to another elegant option that’s just as rewarding: the Pour-Over.
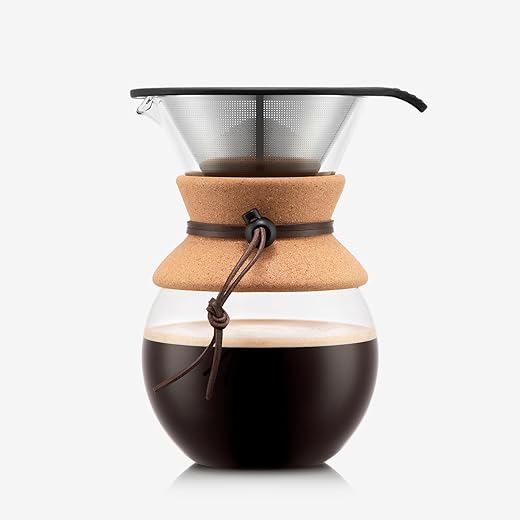
The Elegant Pour-Over
Pour-over coffee has become a staple for many coffee aficionados, and it’s easy to see why. Its simplicity allows for a clean extraction that highlights the unique flavor profiles of each coffee bean. As I embarked on my own pour-over journey, I experimented with various techniques and equipment to perfect this art.
My Go-To Equipment
To start, I recommend investing in a few essential tools:
The Steps to Perfect Pour-Over
- Select Your Beans: I usually choose medium to light roasts for their vibrant flavors. A 1:15 coffee-to-water ratio usually works wonders (e.g., 20g of coffee to 300ml of water).
- Grind: Grind your beans to a medium-fine consistency, similar to table salt.
- Bloom: Start by pouring just enough water to saturate the coffee grounds—wait 30 seconds to let the flavors release.
- Pour: In a slow, circular motion, pour the water over the coffee, avoiding the filter. The goal is to saturate the coffee evenly.
- Let it Drip: Once all the water has passed through, allow it to drip for about 2-3 minutes before enjoying the delightful aromas.
Crafting Flavorful Experiences
What I adore most about the pour-over method is how every little detail can impact the taste. From the grind size to the pouring technique, each variable is a chance to discover new flavor notes. I remember a moment when I brewed a bright Ethiopian Yirgacheffe and was amazed at the sweet blueberry notes that emerged—truly a revelation!
With the elegance and flexibility of pour-over brewing, it’s no wonder it’s become my favorite coffee ritual. And as we explore further, we’ll discover another classic method that brews bold flavors—the Traditional Moka Pot.
The Versatile AeroPress
If you’re looking for versatility, the AeroPress is my top pick. This compact and ingenious device has revolutionized my coffee brewing experience. With the AeroPress, I can create everything from rich espresso-style shots to smooth Americanos, all at the press of a button—well, more like at the press of a plunger!
Unique Brewing Process
The AeroPress uses a unique brewing method that relies on air pressure to extract flavors from coffee grounds. It’s simple but effective: you add your coffee and water, stir, and then apply pressure with the plunger to push hot water through the grounds. In just a few minutes, you have a delicious cup of coffee ready to be savored.
The beauty of the AeroPress lies in its adaptability. I can adjust the grind size, water temperature, and steeping time to suit my preferences. For a strong, espresso-like brew, I’ll use a fine grind and heat the water to about 200°F. For something lighter, I go for a coarser grind and a slightly lower temperature.
Ideal for On-the-Go
What I love even more is how portable the AeroPress is. It fits perfectly in my travel bag, making it my go-to companion on camping trips or weekend getaways. Whether I’m brewing in the comfort of my kitchen or in the great outdoors, the AeroPress never disappoints. I once brewed a cup by a serene lake at dawn, and little did I know, the coffee was as vibrant as the sunrise!
This little device truly embodies the spirit of manual brewing—quick, customizable, and engaging. Speaking of engaging methods, let’s now dive into a traditional brewing technique that takes us back in time: the Moka Pot.
The Traditional Moka Pot
Moka pots are a treasure in the coffee world, lending a strong, espresso-like brew that is robust and flavorful. Whenever I think about a stovetop device that delivers a quick caffeine fix, the Moka Pot comes to mind. It’s a wonderfully nostalgic way to brew coffee, reminiscent of cozy mornings and familial traditions. Let’s explore how to operate this charming little brewer and unlock its rich potential.
How to Brew with a Moka Pot
- Fill the Bottom Chamber: Start by adding water to the bottom chamber—just below the safety valve.
- Add Coffee Grounds: Place a filter in the funnel and fill it with finely ground coffee, leveling it off without packing it down. I usually use about 20g of coffee for a 3-cup Moka Pot.
- Assemble and Heat: Screw the top and bottom chambers together. Place the Moka Pot on a medium flame—don’t rush this part; patience is key!
- Listen for the Gurgle: In a few minutes, you’ll hear a gurgling noise as the coffee begins to extract. Once the sound changes to a hissing, your brew is ready.
My Moka Pot Experience
What I adore most about the Moka Pot is how it creates coffee that is both bold and nuanced. I’ve tried numerous brewing techniques, adjusting the grind size and water temperature, but found the best results using fresh medium roast beans.
When I brew with my Moka Pot, I often think about a trip to Italy where I first experienced its magic. Sitting on a sunlit terrace, sipping an espresso-like cup made me appreciate the deep, chocolatey notes—a true delight!
With its rich flavors and delightful process, the Moka Pot invites you to slow down and savor each sip. Ready to shift gears? Next up, we’ll explore another fascinating brewing method that unveils vibrant characters—introducing the Richly Flavored Siphon Brewer!
The Richly Flavored Siphon Brewer
The siphon brewer is a true showstopper, a spectacle for the senses that elevates both the brewing process and the resulting cup of coffee. Not only does it deliver an exceptional flavor profile, but it also captivates with its theatrical process, turning coffee making into an eye-catching performance.
The Art of Brewing with a Siphon
To brew with a siphon, you need to understand a few essential components. The beauty lies in the combination of vacuum and gravity, which creates a clean and aromatic brew. Here’s how I create my perfect cup:
- Set Up Your Siphon: Start by assembling the brewer with the upper and lower bowls. Ensure the filter chain is clean and properly installed.
- Measure Your Coffee: For a rich experience, I use about 25g of medium-coarse coffee beans per 400ml of water.
- Heat the Water: Fill the lower bowl with water and apply heat until it begins to boil. As the water heats, it will rise into the upper bowl through the siphon tube.
- Add the Coffee: Once the water is in the upper bowl, add your coffee grounds and stir gently to ensure even saturation.
- Let It Steep: Remove the heat and allow the coffee to brew for around 1-2 minutes before gently stirring again.
- Finish the Brew: Reapply heat briefly to create a vacuum that pulls the brewed coffee back down into the lower chamber, leaving the grounds behind.

The Experience
What I love about the siphon is the way it highlights the subtleties in coffee flavors. Each brewing session feels like an experiment, where variations in time and temperature unveil different notes. For instance, using a bright Kenyan bean can result in floral aromas paired with a sweet finish—it’s like magic in a glass!
Its mesmerizing performance draws the attention of everyone around, making the siphon a fantastic conversation starter for coffee enthusiasts looking to impress guests. As I finish the brewing process, I’m always excited to take the first sip.
After experiencing the aesthetic joy of the siphon, we’ll soon explore an ever-refreshing method that cools things down—welcome to the Essential Cold Brew Maker!
The Essential Cold Brew Maker
Cold brew coffee is a refreshing alternative that deserves its place among my top manual brewers. This method allows me to enjoy incredibly smooth and flavorful coffee with minimal acidity, making it perfect for those warm days or when I just want something a little different. Creating cold brew at home is surprisingly easy and involves just a few steps and the right equipment.
Simple Brewing Steps
- Coarse Grind Coffee: Start with coarsely ground coffee beans. For a standard 1:4 coffee-to-water ratio, I use about 1 cup of coffee for every 4 cups of cold water.
- Mix and Steep: Combine the coffee and water in a jar or dedicated cold brew maker. No need for fancy equipment—just mix them together and let it steep in the fridge for 12-24 hours, depending on your flavor preference.
- Strain: After steeping, strain the mixture through a fine mesh sieve or a dedicated filter to separate the coffee grounds from the liquid.
- Serve and Enjoy: You can dilute your cold brew with milk or water if you prefer a lighter taste, or serve it over ice with your favorite flavorings.

My Cold Brew Recommendations
Each cold brew maker offers unique advantages, from convenience to aesthetics. Here are a couple of my favorites:
Whether it’s the ease of brewing or the unique flavor profile, my experiences with cold brew have taught me to appreciate its refreshing charm. As the days get warmer, having a cold brew ready in the fridge makes enjoying my coffee ritual even more delightful.
With this refreshing approach to coffee, it’s time to transition to mastering your entire coffee ritual. Let’s wrap up our journey through these manual brewing methods!
Mastering Your Coffee Ritual
As we conclude this exploration of my top seven manual coffee makers, I hope you feel inspired to embrace the art of brewing. Each method offers a unique journey into the world of coffee, allowing you to express your personal taste and creativity. The beauty of manual brewing lies in its simplicity and the rewarding experience it provides.
Like any craft, practice leads to perfection. With each manual brewing session, you become a better barista at home. So, gather your tools, experiment with different techniques, and savor each cup you create. Cheers to crafting your next delicious brew!


Wow, I had no idea there were so many ways to brew! I’ve always stuck to French press at home because it’s what I know, but you definitely made me want to try that AeroPress. 🤔 Do you think it’s worth it for someone who’s always loved their classic brew?
Definitely! The AeroPress is super versatile. You can make espresso-like coffee and cold brew with it too! 🙌
Hey Sarah! I think the AeroPress is a game changer, especially if you’re looking to experiment with your coffee flavors. Plus, it’s really easy to clean up!
I’m all about that moka pot life! Italian coffee at home is something I can’t give up. 😋 Do you think it’s still worth getting a stovetop model if you can afford a fancy espresso machine?
Absolutely, Patricia! Moka pots give you a strong brew that’s unique in its own right. Plus, they’re way more affordable and can fit into any kitchen.
I used to think the same, but honestly, my moka pot has never let me down. It has its own charm, you know what I mean?
I don’t get the whole manual coffee thing. Aren’t machines supposed to make life easier? 😂 But I do love cold brew! Thinking about that cold brew maker you mentioned—does it really cut down on bitterness like people say?
Hey Dylan! Yep, cold brew tends to be less acidic and smoother than hot brewed coffee. If you like cold brews, the maker might be perfect for you!
I agree, Dylan. Manual isn’t always better, but I’ve found it can be therapeutic. Still, cold brew is like a must-have in summer! ☀️
I loved your write-up on the siphon brewer! 😯 I’ve always found it fascinating but never had the guts to try it out. Seems like a fun way to brew though. How much practice does it take?
Hey Jake! It can be tricky at first, but once you get the hang of it, it’s super fun! Just follow the steps carefully and you’ll end up with some killer coffee.
Definitely looks amazing, but I’ve heard it can be tricky to master. If you mess up, the coffee could taste off. I’d love to see a video of you brewing it, Jake!
I got the Bodum Pour Over from your list, and I love it! 😍 But how does it compare to a regular French press? More flavor? Less?
Hey Kevin! The Bodum is definitely different. Many people find it to be smoother than French press. The method lets you control the speed of your pouring, which really impacts the taste!
I think the pour over gives you much clearer flavors since the coffee grounds aren’t sitting in water for long. Have you noticed a difference, Kevin? 🤔